Using Firecracker and Go to run short-lived, untrusted code execution jobs

Table of Contents
This post has been discussed on Hacker News
This semester, I have been working on a school project where the main requirement was to execute user-submitted code in one form or another.
My team’s subject was a code benchmarking platform, where users could create benchmarks (e.g., sort these two arrays as fast as possible) and then anyone could submit solutions to the benchmarks.
In this post, I want to dive into the code execution part of the project, the approach I took, and how I used Firecracker, with concrete code snippets.
Overview of the project #
To put things in context, here’s a screenshot of the final version of the frontend:
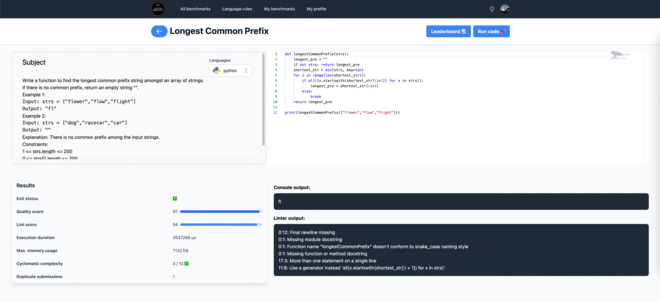
The service supports C++, Python, and Go and performs some code analysis on the submitted code.
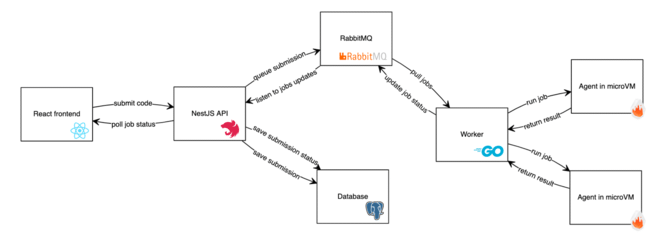
Here is a schema of the global architecture:
All the code is available on GitHub.
The main API is written with NestJS in TypeScript and contains all the features of the service. The code analysis is also done there. However, the code submissions are actually sent to a RabbitMQ queue and handled by workers and agents.
The choice of Firecracker #
One of the objectives set for the project was to focus on security and isolation for the untrusted code execution part. Instinctively, Docker containers seem like an easy way to achieve this goal. However, I was aware that Docker itself is not completely safe in that regard. While researching additional security layers for containers, I remembered that Firecracker was a thing and decided to give it a try.
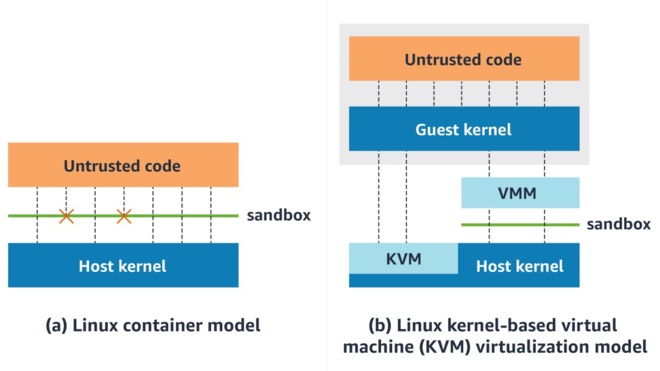
Firecracker is a virtual machine manager (VMM) that powers AWS Lambda and AWS Fargate and has been used in production at AWS since 2018. It also powers other multi-tenant serverless services such as Koyeb and Fly.io.
I was aware of the project but didn’t have an occasion to actually use it. The Getting Started guide from the documentation was an excellent resource. In general, the docs are very good.
The main selling points of Firecracker are its very low overhead in terms of resource usage and its ability to start a staggering number of VMs at the same time (the docs say one can create 180 microVMs per second on a host with 36 physical cores). Usually, we have to choose between the strong isolation but high overhead of virtualization versus the lower overhead but lower isolation of containers. Firecracker is great because it doesn’t compromise on either security or performance.
The key concept to understand is that Firecracker is a VMM, so it will manage one microVM at a time. The VMM process will run an HTTP API listening on a socket. To configure and interact with the VM, you need to go through the API. For example, to start a microVM, you would start the VMM with ./firecracker --api-sock /tmp/firecracker.socket, send HTTP requests to configure the VM, and then start it:
curl --unix-socket /tmp/firecracker.socket -i \
  -X PUT 'http://localhost/actions'       \
  -H  'Accept: application/json'          \
  -H  'Content-Type: application/json'    \
  -d '{
      "action_type": "InstanceStart"
   }'
Since this is quite unhandy, there is an official CLI available: firectl. It is based on the Go SDK to interact with the VMM API.
Starting a VM is as easy as this:
./firectl/firectl \
  --kernel=linux/vmlinux \
  --root-drive=rootfs.ext4
After playing around for a bit, I was satisfied with the ease of use and performance of Firecracker, so I decided to try and build something for our school project on top of it.
Project architecture #
The approach I took was to use workers that would receive messages from the main API and spawn microVMs to execute the user-submitted code through an agent inside the microVM.
Agent #
Since my final goal is to run code inside the microVM, I had to have a program running inside of it that was accessible somehow.
The agent is an HTTP API in Go made with Echo that is able to compile and run standalone C, C++, Python, and Go. It simply shells out compiler commands and handles the output. It’s not particularly smart or secure, but it is good enough for the project.
I tried to use Rust for the API (the code is still in the repo) since I had a Rust class at the time, but I lost too much time fighting with the language and went back to Go since I’m much more familiar with it.
Here is an example of the API compiling and executing simple C code:
» curl -i localhost:8080/run -X POST --data '{"code":"#include <stdio.h>\r\nint main() {\r\n   printf(\"Hello, C!\");\r\n   return 0;\r\n}","id":"123","variant":"gcc","language":"c"}' -H 'Content-Type: application/json'
HTTP/1.1 200 OK
Content-Type: application/json; charset=UTF-8
Date: Sat, 31 Jul 2021 20:04:04 GMT
Content-Length: 104

{"message":"Success","error":"","stdout":"Hello, C!","stderr":"","exec_duration":1843,"mem_usage":9432}
The code is pretty simple, let’s quickly walk through it. Here is an excerpt of the C handler:
// Compile code
var compileStdOut, compileStdErr bytes.Buffer
compileCmd := exec.Command("gcc", "-x", "c", "/tmp/"+req.ID, "-o", "/tmp/"+req.ID+".out")
compileCmd.Stdout = &compileStdOut
compileCmd.Stderr = &compileStdErr
err := compileCmd.Run()

if err != nil {
	return c.JSON(http.StatusBadRequest, runCRes{
		Message: "Failed to compile",
		Error:   err.Error(),
		Stdout:  compileStdOut.String(),
		Stderr:  compileStdErr.String(),
	})
}

// Run executable
return execCmd(c, "/tmp/"+req.ID+".out")
And the execution handler:
func execCmd(c echo.Context, program string, arg ...string) error {
	var execStdOut, execStdErr bytes.Buffer

	cmd := exec.Command(program, arg...)
	cmd.Stdout = &execStdOut
	cmd.Stderr = &execStdErr

	start := time.Now()
	err := cmd.Run()
	elapsed := time.Since(start)

	if err != nil {
		return c.JSON(http.StatusBadRequest, runCRes{
			Message:      "Failed to run",
			Error:        err.Error(),
			Stdout:       execStdOut.String(),
			Stderr:       execStdErr.String(),
			ExecDuration: elapsed.Microseconds(),
			MemUsage:     cmd.ProcessState.SysUsage().(*syscall.Rusage).Maxrss,
		})
	}

	return c.JSON(http.StatusOK, runCRes{
		Message:      "Success",
		Stdout:       execStdOut.String(),
		Stderr:       execStdErr.String(),
		ExecDuration: elapsed.Microseconds(),
		MemUsage:     cmd.ProcessState.SysUsage().(*syscall.Rusage).Maxrss,
	})
}
Once the agent was done, I needed to create a VM image with the agent preinstalled in it.
The image for the VM will be based on Alpine Linux, so first I have to compile the program statically:
go build -tags netgo -ldflags '-extldflags "-static"'
I also need to prepare an OpenRC service that will start the agent when the VM boots:
#!/sbin/openrc-run

name=$RC_SVCNAME
description="CodeBench agent"
supervisor="supervise-daemon"
command="/usr/local/bin/agent"
pidfile="/run/agent.pid"
command_user="codebench:codebench"

depend() {
	after net
}
Then, I will build the rootfs using the same technique shown in the Firecracker docs, which relies on creating an ext4 filesystem in an image file, mounting it in a Docker container running Alpine, and copying the filesystem from the container.
dd if=/dev/zero of=rootfs.ext4 bs=1M count=1000
mkfs.ext4 rootfs.ext4
mkdir -p /tmp/my-rootfs
mount rootfs.ext4 /tmp/my-rootfs

docker run -i --rm \
    -v /tmp/my-rootfs:/my-rootfs \
    -v "$(pwd)/agent:/usr/local/bin/agent" \
    -v "$(pwd)/openrc-service.sh:/etc/init.d/agent" \
    alpine sh <setup-alpine.sh

umount /tmp/my-rootfs

# rootfs available under `rootfs.ext4`
The rootfs is currently a 1GB image, which is a bit big, especially since the worker has to copy it every time it creates a new VM. There are multiple programming languages installed though, hence the size.
The setup script for Alpine also contains the installation of the compiler/runtimes needed for the agent:
apk add --no-cache openrc
apk add --no-cache util-linux
apk add --no-cache gcc libc-dev
apk add --no-cache python2 python3
apk add --no-cache go
apk add --no-cache g++

ln -s agetty /etc/init.d/agetty.ttyS0
echo ttyS0 >/etc/securetty
rc-update add agetty.ttyS0 default

echo "root:root" | chpasswd

echo "nameserver 1.1.1.1" >>/etc/resolv.conf

addgroup -g 1000 -S codebench && adduser -u 1000 -S codebench -G codebench

rc-update add devfs boot
rc-update add procfs boot
rc-update add sysfs boot

rc-update add agent boot

for d in bin etc lib root sbin usr; do tar c "/$d" | tar x -C /my-rootfs; done
for dir in dev proc run sys var tmp; do mkdir /my-rootfs/${dir}; done

chmod 1777 /my-rootfs/tmp
mkdir -p /my-rootfs/home/codebench/
chown 1000:1000 /my-rootfs/home/codebench/
And that’s it, I now have a rootfs with the agent preinstalled.
Worker #
This is the interesting part: the piece that is between the main API and the microVMs. Its responsibilities are to:
- Receive code execution jobs from the API
- Handle VMMs creation/deletion
- Communicate the jobs to the agent
- Handle job status updates (failures, success, etc.)
First, I need to receive jobs from the main API. I decided to use an external message queue so that the whole process is asynchronous and easily scalable. I tried to use Redis at first to keep things simple, and although it was working as expected on the worker side, the NestJS API was a different story.
The native RabbitMQ implementation wasn’t matching what I needed either. Luckily the @golevelup/nestjs-rabbitmq NPM package saved me!
In my SubmissionsService, I can simply send a job to RabbitMQ:
// Send job to worker
await this.amqpConnection.publish("jobs_ex", "jobs_rk", {
  id: submission.id,
  code: createSubmissionDTO.code,
  language: createSubmissionDTO.language,
});
In my Worker, here is the code that will receive the job:
q = newJobQueue(rabbitMQURL)
defer q.ch.Close()
defer q.conn.Close()

err := q.getQueueForJob(ctx)
if err != nil {
  log.WithError(err).Fatal("Failed to get status queue")
  return
}

log.Info("Waiting for RabbitMQ jobs...")
for d := range q.jobs {
  log.Printf("Received a message: %s", d.Body)

  var job benchJob
  err := json.Unmarshal([]byte(d.Body), &job)
  if err != nil {
    log.WithError(err).Error("Received invalid job")
    continue
  }

  go job.run(ctx, WarmVMs)
}
The newJobQueue function will:
- connect to the AMQP endpoint
- open a channel
- declare an exchange (
jobs_ex) - declare a queue (
jobs_q) - bind the queue to the exchange (
jobs_q->jobs_exusing thejobs_rkrouting key) - start consuming messages from the queue and return a
<-chan amqp.Deliverychannel
When the worker receives a job, it launches a handler in a goroutine: go job.run(ctx, WarmVMs). But what is WarmVMs?
Earlier in the main() function, the worker created a buffered channel of size 10 and launched a pool handler.
type runningFirecracker struct {
	vmmCtx    context.Context
	vmmCancel context.CancelFunc
	vmmID     string
	machine   *firecracker.Machine
	ip        net.IP
}

// in main()
WarmVMs := make(chan runningFirecracker, 10)
go fillVMPool(ctx, WarmVMs)
Even if microVMs are fast to create and start, it will still take a few seconds (in my case, at least). Since I want the user to wait as little as possible, I decided to have a pool of “warm” microVMs that are ready to use.
The pool handler is simply an infinite loop in a goroutine:
func fillVMPool(ctx context.Context, WarmVMs chan<- runningFirecracker) {
	for {
		select {
		case <-ctx.Done():
			// Program is stopping, WarmVMs will be cleaned up, bye
			return
		default:
			vm, err := createAndStartVM(ctx)
			if err != nil {
				log.Error("failed to create VMM")
				time.Sleep(time.Second)
				continue
			}

			log.WithField("ip", vm.ip).Info("New VM created and started")

			// Don't wait forever, if the VM is not available after 10s, move on
			ctx, cancel := context.WithTimeout(ctx, 10*time.Second)
			defer cancel()

			err = waitForVMToBoot(ctx, vm.ip)
			if err != nil {
				log.WithError(err).Info("VM not ready yet")
				vm.vmmCancel()
				continue
			}

			// Add the new microVM to the pool.
			// If the pool is full, this line will block until a slot is available.
			WarmVMs <- *vm
		}
	}
}
The microVM is added to the pool once it is “ready”. It uses the health endpoint of the agent to know when that’s the case:
func waitForVMToBoot(ctx context.Context, ip net.IP) error {
	// Query the agent until it provides a valid response
	req.SetTimeout(500 * time.Millisecond)
	for {
		select {
		case <-ctx.Done():
			// Timeout
			return ctx.Err()
		default:
			res, err := req.Get("http://" + ip.String() + ":8080/health")
			if err != nil {
				log.WithError(err).Info("VM not ready yet")
				time.Sleep(time.Second)
				continue
			}

			if res.Response().StatusCode != 200 {
				time.Sleep(time.Second)
				log.Info("VM not ready yet")
			} else {
				log.WithField("ip", ip).Info("VM agent ready")
				return nil
			}
			time.Sleep(time.Second)
		}
	}
}
If the agent is reachable, it means the microVM is started, the network is up, and the agent is ready to receive code execution requests.
To start a microVM, the worker does a bunch of things:
- Copy the “golden image” of the rootfs to a temp file (dedicated to the microVM)
- Set up the config (
firecracker.Config) - Create a
firecracker.Machine - Start the machine, aka the VMM instance.
Then it returns a runningFirecracker struct that will be stored in the channel. The struct contains a bunch of things such as:
- the IP address of the VM, which will be used to communicate with the agent inside it
- the
firecracker.Machineand context, which will be used to destroy the VM once the job is done or when the context is canceled
// Create a VMM with a given set of options and start the VM
func createAndStartVM(ctx context.Context) (*runningFirecracker, error) {
	vmmID := xid.New().String()

	copy("../agent/rootfs.ext4", "/tmp/rootfs-"+vmmID+".ext4")

	fcCfg, err := getFirecrackerConfig(vmmID)
	if err != nil {
		log.Errorf("Error: %s", err)
		return nil, err
	}

  	// ... more boring stuff

  	vmmCtx, vmmCancel := context.WithCancel(ctx)

	m, err := firecracker.NewMachine(vmmCtx, fcCfg, machineOpts...)
	if err != nil {
		vmmCancel()
		return nil, fmt.Errorf("failed creating machine: %s", err)
	}

	if err := m.Start(vmmCtx); err != nil {
		vmmCancel()
		return nil, fmt.Errorf("failed to start machine: %v", err)
	}

	log.WithField("ip", m.Cfg.NetworkInterfaces[0].StaticConfiguration.IPConfiguration.IPAddr.IP).Info("machine started")

	return &runningFirecracker{
		vmmCtx:    vmmCtx,
		vmmCancel: vmmCancel,
		vmmID:     vmmID,
		machine:   m,
		ip:        m.Cfg.NetworkInterfaces[0].StaticConfiguration.IPConfiguration.IPAddr.IP,
	}, nil
The firecracker.Config contains the configuration of the VM: Kernel, storage, network, resources, etc. The code above and below was adapted from the source code of the firectl project, which the best example of the Go SDK usage I found. Luckily, the only SDK available for Firecracker is in Go, which is the language I’m the most comfortable with.
func getFirecrackerConfig(vmmID string) (firecracker.Config, error) {
	socket := getSocketPath(vmmID)
	return firecracker.Config{
		SocketPath:      socket,
		KernelImagePath: "../../linux/vmlinux",
		LogPath:         fmt.Sprintf("%s.log", socket),
		Drives: []models.Drive{{
			DriveID:      firecracker.String("1"),
			PathOnHost:   firecracker.String("/tmp/rootfs-" + vmmID + ".ext4"),
			IsRootDevice: firecracker.Bool(true),
			IsReadOnly:   firecracker.Bool(false),
			RateLimiter: firecracker.NewRateLimiter(
				// bytes/s
				models.TokenBucket{
					OneTimeBurst: firecracker.Int64(1024 * 1024), // 1 MiB/s
					RefillTime:   firecracker.Int64(500),         // 0.5s
					Size:         firecracker.Int64(1024 * 1024),
				},
				// ops/s
				models.TokenBucket{
					OneTimeBurst: firecracker.Int64(100),  // 100 iops
					RefillTime:   firecracker.Int64(1000), // 1s
					Size:         firecracker.Int64(100),
				}),
		}},
		NetworkInterfaces: []firecracker.NetworkInterface{{
			// Use CNI to get dynamic IP
			CNIConfiguration: &firecracker.CNIConfiguration{
				NetworkName: "fcnet",
				IfName:      "veth0",
			},
		}},
		MachineCfg: models.MachineConfiguration{
			VcpuCount:  firecracker.Int64(1),
			HtEnabled:  firecracker.Bool(true),
			MemSizeMib: firecracker.Int64(256),
		},
	}, nil
}
A few things to note:
- There is a native rate limiter that we can use to limit the number of disk ops per second and/or disk bandwidth. In our case, benchmarked code should not use the disk, so we can aggressively limit disk usage to protect the host.
- The microVMs will be limited to 1 CPU thread and 256 MiB of memory. This should be more than enough for our use case. Conveniently, Firecracker supports soft-allocation and CPU/memory oversubscription, so the VMs waiting in the pool won’t waste much resources.
Even networking is easy thanks to CNI plugins. On the host, a simple config is needed in /etc/cni/conf.d/fcnet.conflist:
{
  "name": "fcnet",
  "cniVersion": "0.4.0",
  "plugins": [
    {
      "type": "ptp",
      "ipMasq": true,
      "ipam": {
        "type": "host-local",
        "subnet": "192.168.127.0/24",
        "resolvConf": "/etc/resolv.conf"
      }
    },
    {
      "type": "tc-redirect-tap"
    }
  ]
}
With the following CNI plugins binaries in /opt/cni/bin:
From containernetworking/plugins:
host-local: Maintains a local database of allocated IPsptp: Creates a veth pair
From: awslabs/tc-redirect-tap
tc-redirect-tap: adapt pre-existing CNI plugins/configuration to a tap device
In my case, I didn’t want the microVM to have internet access, so I simply set ipMasq to false in the config above. This will disable the IP masquerade on the host for this network.
In the main() function earlier, the received job is sent to a goroutine with go job.run(ctx, WarmVMs). This is what happens then:
func (job benchJob) run(ctx context.Context, WarmVMs <-chan runningFirecracker) {
	log.WithField("job", job).Info("Handling job")

	// Set status in RabbitMQ: received
	err := q.setjobReceived(ctx, job)
	if err != nil {
		log.WithError(err).Error("Could not set job received")
		q.setjobFailed(ctx, job, agentExecRes{Error: err.Error()})
		return
	}

	// Get a ready-to-use microVM from the pool
	vm := <-WarmVMs

	// Defer cleanup of VM and VMM
	go func() {
		defer vm.vmmCancel()
		vm.machine.Wait(vm.vmmCtx)
	}()
	defer vm.shutDown()

	var reqJSON []byte

	reqJSON, err = json.Marshal(agentRunReq{
		ID:       job.ID,
		Language: job.Language,
		Code:     job.Code,
	})
	if err != nil {
		log.WithError(err).Error("Failed to marshal JSON request")
		q.setjobFailed(ctx, job, agentExecRes{Error: err.Error()})
		return
	}

	// Set status in RabbitMQ: running
	err = q.setjobRunning(ctx, job)
	if err != nil {
		log.WithError(err).Error("Could not set job running")
		q.setjobFailed(ctx, job, agentExecRes{Error: err.Error()})
		return
	}

	// Send code to the agent inside the microVM
	var httpRes *http.Response
	var agentRes agentExecRes

	httpRes, err = http.Post("http://"+vm.ip.String()+":8080/run", "application/json", bytes.NewBuffer(reqJSON))
	if err != nil {
		log.WithError(err).Error("Failed to request execution to agent")
		q.setjobFailed(ctx, job, agentExecRes{Error: err.Error()})
		return
	}
	json.NewDecoder(httpRes.Body).Decode(&agentRes)
	log.WithField("result", agentRes).Info("Job execution finished")
	if httpRes.StatusCode != 200 {
		log.WithFields(log.Fields{
			"httpRes":  httpRes,
			"agentRes": agentRes,
			"reqJSON":  string(reqJSON),
		}).Error("Failed to compile and run code")
		q.setjobFailed(ctx, job, agentRes)
		return
	}

	// Set status in RabbitMQ: done + result
	err = q.setjobResult(ctx, job, agentRes)
	if err != nil {
		q.setjobFailed(ctx, job, agentExecRes{Error: err.Error()})
	}
}
The job handler send status updates to another RabbitMQ queue and basically forwards the payload to the agent. The flow looks like this:
			┌────────────────────────────────────────────────────────┐
			│                                                        │
			│                                ┌───────► Done          │
			│    Received  ────►  Running ───┤                       │
			│                                └───────► Failed        │
			│        │                 │                             │
			│        │                 │                             │
			│        └──►  Failed      └──►  Failed                  │
			│                                                        │
			└────────────────────────────────────────────────────────┘
If the job fails during the execution phase, the stdout/stderr output is also returned.
On the NestJS API side, there is a subscriber for jobs_status_*:
@RabbitSubscribe({
	exchange: 'jobs_status_ex',
	routingKey: 'jobs_status_rk',
	queue: 'jobs_status_q',
})
public async handleJobStatus(msg: string): Promise<void> {
	const jobSerializer = new TypedJSON(JobStatusDTO);
	const jobStatus = jobSerializer.parse(msg);

	if (jobStatus) {
		// Save in DB
		await this.setStatus({...jobStatus});
	}
}
On the worker side, once the job is done, the defered shutdown function is called:
func (vm runningFirecracker) shutDown() {
	log.WithField("ip", vm.ip).Info("stopping")
	vm.machine.StopVMM()
	err := os.Remove(vm.machine.Cfg.SocketPath)
	if err != nil {
		log.WithError(err).Error("Failed to delete firecracker socket")
	}
	err = os.Remove("/tmp/rootfs-" + vm.vmmID + ".ext4")
	if err != nil {
		log.WithError(err).Error("Failed to delete firecracker rootfs")
	}
}
At this point, a new microVM has already been added to the pool. Indeed, the worker gets a VM from the pool earlier with vm := <-WarmVMs. Since the pool handler is blocking on this channel, it will already have a new microVM ready and will add it right after the “pop” from the pool.
Worker architecture #
The overall architecture of the worker can be summed up as follows:
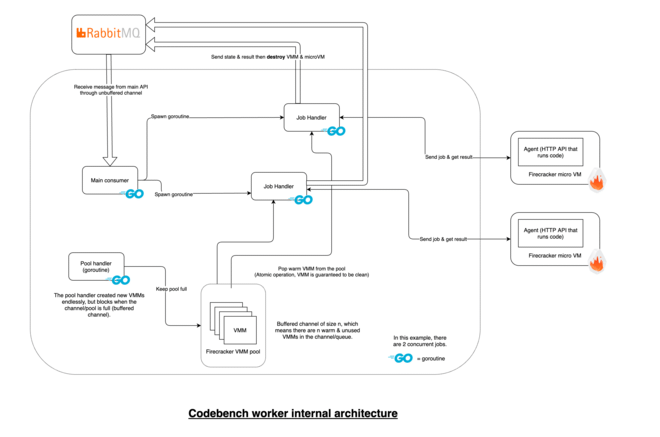
Job Handler and microVM parts are dynamically created and destroyed.Our production infrastructure for this project was hosted on Digital Ocean. Since their droplets support nested virtualization, we were able to run the Firecracker microVMs inside another VM.
Complete execution flow #
Here is an attempt to sum up the execution flow of a code submission sequentially:
| Component | Action |
|---|---|
Worker | Launch and maintain pool of X prebooted microVMs in the background |
Worker | Bind to RabbitMQ queue jobs_q on jobs_ex exchange and jobs_rk routing key |
API | Bind to RabbitMQ queue jobs_status_q on jobs_status_ex exchange and jobs_status_rk routing key |
Front | POST /submissions |
Front | Poll GET /submissions/:id every 500 ms |
API | Send job to RabbitMQ on jobs_ex direct exchange with jobs_rk routing key. |
Worker | Receive job, get warm microVM from pool, send job to agent in microVM |
Agent | Compile/Run code, return result |
Worker | During two previous steps, send status of jobs on jobs_status_ex exchange with jobs_status_rk routing key, including the final result |
API | Receive each new status on jobs_status_q, and insert them into DB and in-memory cache, so that the polling can get the latest status. |
Front | Get the final result, stop polling and display it. |
Possible improvements #
Overall, I’m happy with the results, and I achieved what I needed for the project. However, there are several things that could be improved.
Jailer #
Using jailer would be great to further isolate the Firecracker process and provide an additional security barrier. If the project was meant to be used in production, I would definitely look into that.
Optimise rootfs usage/copying #
Copying the 1 GB rootfs before starting each microVM slows down the creating process by a few seconds and waste disk resources. An improvement could be to use a filesystem on the host that support copy-on-write to limit the overhead. That being said, copying the entire rootfs is still overkill. It might not be needed in the first place. The agent writes the code to files in /tmp, but this could easily be done in a tmpfs. Thus, a solution would be to use the same rootfs in a read-only mode. That would remove the need to copy it, and would not decrease isolation.
The docs on root filesystem says in the requirements:
(If sharing the root filesystem image among multiple VMs) Ability to run successfully from a read-only device, in order to prevent a VM from manipulating the filesystem in use by another VM.
So that option looks feasible.
AWS says they are able to start Firecracker microVMs in few hundreds of milliseconds, where in my case it takes a few seconds. I suppose this is because I’m using a fully fledged Linux distribution with an init system and all kind of services. Cleaning up the Alpine image or using a fully custom guest image could result in significant improvements in that regard.
Reuse or share microVMs #
To also raises the question of reusing microVMs. The code submissions on Codebench are all meant to be public, so the requirements of isolation the workloads between each other are not as important on platforms such as AWS Lambda or Koyeb. That being said, there is still the requirement of resource isolation, so sharing microVMs between users with the current architecture won’t really fit.
Another option could be to dedicate a microVM to each user. That would be the best compromise, except that it would mean adding logic to assign a VM to each user: when the worker receives some code, it would create a microVM or forward it to the existing microVM for the user. Then, to prevent wasting resources (even if a single microVM with the agent doesn’t consume much memory), the worker would have to destroy the microVM if the user is not actively using it anymore. Maybe some kind of idle timeout would do it?
Also, under a high number of simultaneous code submissions, the worker would consume more microVMs that it is creating, even if it has resources available. An easy solution would be to launch multiple “pool handlers”, or to launch VMM creations in goroutines.
Recycle microVMs #
To reuse VMs, a friend of mine suggested using a technique implemented in PBot, an IRC bot. The bot supports executing user-submitted code in a VM, and restores the VM to a clean snapshot after each execution.
Luckily, Firecracker has a snapshotting feature which looks very promising:
The design allows sharing of memory pages and read only disks between multiple microVMs. When loading a snapshot, instead of loading at resume time the full contents from file to memory, Firecracker creates a MAP_PRIVATE mapping of the memory file, resulting in runtime on-demand loading of memory pages. Any subsequent memory writes go to a copy-on-write anonymous memory mapping. This has the advantage of very fast snapshot loading times, but comes with the cost of having to keep the guest memory file around for the entire lifetime of the resumed microVM.
The Firecracker snapshot create/resume performance depends on the memory size, vCPU count and emulated devices count. The Firecracker CI runs snapshots tests on AWS m5d.metal instances for Intel and on AWS m6g.metal for ARM. The baseline for snapshot resume latency target on Intel is under 8ms with 5ms p90, and on ARM is under 3ms for a microVM with the following specs: 2vCPU/512MB/1 block/1 net device.
So that could also be a solution worth looking at.
Conclusion #
It was a fun project to work and I learned a lot through hands-on experience with Firecracker. I didn’t encounter any issue with Firecracker itself. The documentation is surprisingly detailed and helpful. The only bug I could find was a teeny tiny one in firectl.
Using Go was a pleasure: I was able to iterate quickly and the language didn’t get in my way.
I enjoyed researching a solution of this use-case, which is quite different from the major Firecracker users, namely serverless platforms (from what I can tell).
Hopefully this post will inspire others to build things on top of Firecracker. Another post on Firecracker which helped me get started is this one by Julia Evans, which shows concrete examples of the Go SDK.
If you’re interested, the full code is available on GitHub. Cheers to my mate Gwendal which I worked with on this project!