Automatically build and push Docker images using GitLab CI

Table of Contents
When I began publishing public Docker images, I was using the GitHub integration with the Docker Hub to automatically build and publish my images.
However, the Docker Hub is very slow to build images and has very, very limited configuration options.
Then I discovered Drone which allowed me to build images on my own server, tag them, etc. The thing is I’m limited by the drone-docker plugin and I can’t do everything I want with it.
A few days ago I decided to deepen my knowledge of GitLab CI. I mainly know it from work where we use it for Terraform pipelines. But now that I set it up for a few repositories and understand how it works, I am a new person. GitLab CI is simply awesome. There is nearly no limit to what you can do in your .gitlab.yml!
Using Docker inside GitLab CI #
It’s a bit trickier when you want to use GitLab CI to build Docker images though. Indeed, pipelines are composed of stages, each stage is composed of jobs, and each job runs in its own Docker container. You can define the images used and the commands ran inside the containers.
Docker containers are made of layers, and Docker images are simply a container where its layers are defined by a Dockerfile. When you run the docker build command, it actually spawns a new container and then save the final state of the container into what’s called an image. As we seen, jobs on GitLab CI are ran inside containers… Which would mean we have to run Docker in Docker.
Docker in Docker…? #
Other people already thought about that, so there is a documentation page on this topic. By the way the GitLab documentation is so good: completed, detailed, easy to read.
So, there are 3 approaches to build images with GitLab CI:
- Use a runner is shell mode and give it permission to run docker commands on the host
- Use a runner in privileged docker mode and use Docker in Docker (dind)
- Use a runner in docker mode and give it access to the Docker socket of the host
As you can see, each method needs a form of access to the Docker daemon (you can’t run privileged container on shared runners): we’ll have to use our own gitlab-runner. Thus, it doesn’t matter if you follow this tutorial while using your own instance or gitlab.com.
The Docker in Docker approach is interesting, in the sense that it is possible. However you really want to avoid that. Even Jérôme Petazzoni, the creator of Docker in Docker says: “Using Docker-in-Docker for your CI or testing environment? Think twice.” Indeed it’s not efficient nor reliable, slow and exposes security concerns.
Docker from Docker #
The best option for me is to give actual Docker access to the runner. Using the shell mode, it means adding the gitlab-runner user to the docker group so that it can launch containers. In Docker mode, it means binding the docker socket to the container using a volume. The container will then be able to communicate with the Docker daemon and thus spawn containers.
In any case, giving the runner access to the host’s docker socket means giving it root access, so keep that in mind. You may want to dedicate a VM to your runner.
I want to keep my host as clean as possible, so I went with the last option, but without even having gitlab-runner on the host: I run the runner directly in a container , without installing gitlab-runner on my host and using the docker mode.
Configuring the gitlab-runner container #
Tt’s really easy. Here is my gitlab-runner directory:
.
├── config
│   └── config.toml
└── docker-compose.yml
My docker-compose.yml:
version: '3'

services:
  gitlab-runner:
    image: gitlab/gitlab-runner:alpine-v11.2.0
    container_name: gitlab_runner
    restart: always
    volumes:
      - ./config/:/etc/gitlab-runner/
      - /var/run/docker.sock:/var/run/docker.sock
It’s painless to run. We just need to mount the Docker socket and the configuration file.
A base configuration file may be empty. The first thing you can configure is how much jobs you want running at the same time:
concurrent = 1
One is fine for a light CI/CD workflow and optimum pipeline execution.
One runner for multiple runners 🤔 #
Even though we have one “runner”, e.g. the actual gitlab-runner container, you can configure as much runners you want within this runner. I know it sounds weird, I may be misusing the terminology.
To be clearer: you have one runner. For each repository, you will have to assign one or more “instance” of the runner. GitLab will see different runners, but in fact you only have one runner container, which will handle and queues the different jobs assigned to its “instances”, and execute them in different Docker containers according to the .gitlab.yml configuration for each repository.
I hope it makes sense.
Assigning a runner to a repository #
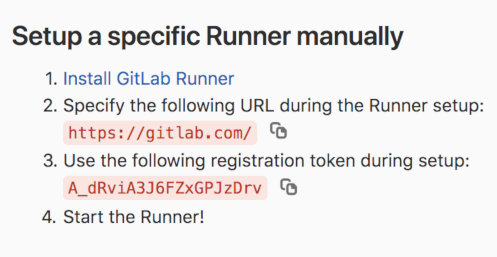
Let’s assign a runner to our GitLab repository. Go to Settings -> CI / CD, and get a token:

Now register your runner trough your Docker runner:
docker-compose run --rm gitlab-runner register -n \
  --url https://gitlab.com/ \
  --registration-token <token> \
  --executor docker \
  --description "Angristan's Docker Runner" \
  --docker-image "docker:stable" \
  --docker-volumes /var/run/docker.sock:/var/run/docker.sock
Adapt it to your GitLab instance’s URL and set the description you want. This will register a Docker runner running on the docker:stable image. Indeed, we have access to the host’s Docker socket so we need the Docker CLI to actually run containers on the host.
After a few seconds, it will output:
Runner registered successfully. Feel free to start it, but if it's running already the config should be automatically reloaded!
Our config.toml file should have a new section:
[[runners]]
  name = "Angristan's Docker Runner"
  url = "https://gitlab.com/"
  token = "xxxxxxxxxxxxxxxxxxxxxx"
  executor = "docker"
  [runners.docker]
    tls_verify = false
    image = "docker:stable"
    privileged = false
    disable_cache = false
    volumes = ["/var/run/docker.sock:/var/run/docker.sock", "/cache"]
    shm_size = 0
  [runners.cache]
Since we ran our register command with --rm, the container disappeared. You can now start your runner:
# run docker-compose down if the runner was running before the register
docker-compose up -d
It should up and running on GitLab:

If you’re on gitlab.com don’t forget to disable shared runners since they won’t be usable for our builds.
Setting up a CI/CD pipeline #
Our repo is ready for GitLab CI. Let’s create a pipeline with one stage and one job.
Here’s a good start:
cover: docker:stable
images: ["docker:stable"]

stages:
  - Build image

docker build:
  stage: Build image
  script:
    - docker info
    - docker build -t myimage .
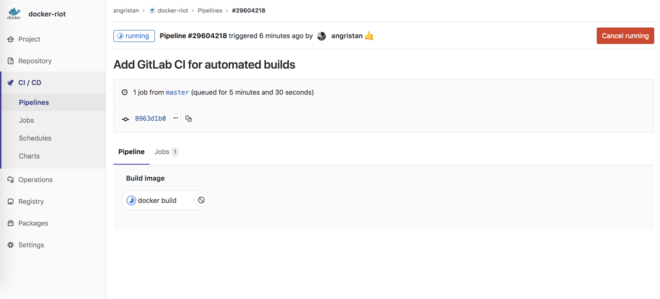
Commit and push, and your pipeline will automatically start:

Click on the job to see the output, and you will see that docker info worked and your image being built.
Now, let’s push our image to the Docker Hub. This can be easily adapted to other registries.
cover: docker:stable
images: ["docker:stable"]

stages:
  - Build image
  - Push to Docker Hub

docker build:
  stage: Build image
  script:
    - docker info
    - docker build -t riot .

docker push:
  stage: Push to Docker Hub
  only:
    - master
  script:
    - echo "$REGISTRY_PASSWORD" | docker login -u "$REGISTRY_USER" --password-stdin
    - docker push angristan/riot
We don’t really have a choice when it comes to logging in. We’ll have to use variables, stored by GitLab:

And then logging in usingstdin.
Please be aware that you won’t be able to login if you have special characters in your password. This made me loose a lot of time until I found out the reason. Also, REGISTRY_USER is your username, not your email.
Commit and push, and after the build job, your image will be pushed to the hub! Using the host’s Docker daemon is really convenient in our case because the image is built and stored in the local registry. That means that the push jobs will have access to the image 👍. That’s why I recommend removing the image after pushing it, in order to keep your local registry clean and saving storage.
Here’s how my usual .gitlab-ci.yml looks like:
cover: docker:stable
images: ["docker:stable"]

variables:
  LATEST_VER: angristan/app:latest
  MAJOR_VER: angristan/app:2
  MINOR_VER: angristan/app:2.3
  PATCH_VER: angristan/app:2.3.1

stages:
  - Build image
  - Push to Docker Hub

docker build:
  stage: Build image
  script:
    - docker info
    - docker build -t $LATEST_VER -t $MAJOR_VER -t $MINOR_VER -t $PATCH_VER .

docker push:
  stage: Push to Docker Hub
  only:
    - master
  script:
    - echo "$REGISTRY_PASSWORD" | docker login -u "$REGISTRY_USER" --password-stdin
    - docker push $LATEST_VER && docker image rm $LATEST_VER
    - docker push $MAJOR_VER && docker image rm $MAJOR_VER
    - docker push $MINOR_VER && docker image rm $MINOR_VER
    - docker push $PATCH_VER && docker image rm $PATCH_VER
It’s pretty short and I can reuse most of it across my images repositories. Note how I handle tags, too.
Make sure to protect your variables. It means they will be accessible only on protected branches/tags, by default master. Otherwise anyone with the permissions to create a branch will be able to echo your Docker Hub password in a job…
On our case, we won’t be able (and we don’t want) to push to the Hub on non-master branches, so I added only: master to the push job. On other branches, the second stage will simply be ignored.

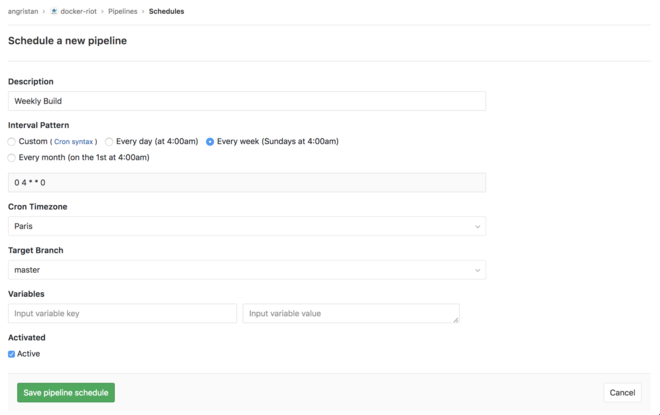
test branch only has one stage.Another thing I like is scheduled builds. Thanks to them, my images are rebuilt and pushed once a week. This is important, because once a repository is configured, I mainly commit to it when there is a new version of the software. But months can happen between versions, so that means images will have months-old underlying layers (OS, packages, dependencies, etc).
This is very easy to setup on GitLab:


So… there we are!
My current setup is:
- My
originis GitHub - The CI / CD is on gitlab.com
- The Docker images are built using my own Docker Gitlab-Runner
- The images are then pushed to the Docker Hub (the only registry I use right now)
Note that since a recent version of GitLab, each repository has its own Docker registry!
This tutorial can be used regardless of your GitLab instance, whether or not your repo is a mirror and whatever your preferred registry is.
And that’s why I fell in love with GitLab CI: it’s pleasant to use and you can do whatever you want with it!